上一篇完成了 Bot 的基本設定與第一個 /ping 指令。這篇深入拆解 Slash Commands 的完整設計:帶參數的指令怎麼定義、選項怎麼設計、所有互動事件怎麼分流。
discord.js v14 把「指令」和「互動」分得很清楚。指令是使用者在 Discord 輸入框看到的選項,互動是使用者按下按鈕、選擇選單、或輸入指令後觸發的事件。兩件事要分開設計。
Slash Commands 的定義方式
discord.js v14 的指令定義是一個純物件陣列,在 client.once("ready") 時呼叫 guild.commands.set() 一次性註冊到 Discord:
const COMMANDS = [
  {
    name: "ping",
    description: "測試 Bot 是否正常運作",
  },
  {
    name: "info",
    description: "查詢指定成員資訊",
    options: [
      {
        name: "user",
        type: 6,           // USER 類型
        description: "要查詢的成員(不填則查詢自己)",
        required: false,
      },
    ],
  },
  {
    name: "remind",
    description: "設定提醒",
    options: [
      {
        name: "message",
        type: 3,           // STRING 類型
        description: "提醒內容",
        required: true,
      },
      {
        name: "minutes",
        type: 4,           // INTEGER 類型
        description: "幾分鐘後提醒",
        required: true,
        min_value: 1,
        max_value: 1440,
      },
    ],
  },
];

// 和上一篇一樣,在 ready 事件裡呼叫 guild.commands.set()
// 差別只是把物件陣列抽成變數,方便後續動態新增指令
client.once("ready", async () => {
  const guild = await client.guilds.fetch(process.env.GUILD_ID);
  await guild.commands.set(COMMANDS);
  console.log("📝 指令已更新!");
});type 是數字代碼,常用的有:
| type | 說明 |
|---|---|
| 3 | STRING(文字輸入或靜態 choices) |
| 4 | INTEGER(整數,可設 min_value / max_value) |
| 5 | BOOLEAN |
| 6 | USER(選擇伺服器成員) |
| 11 | ATTACHMENT(上傳檔案) |
指令定義完畢、Bot 上線後,在 Discord 輸入框輸入 / 就能看到已註冊的指令出現:

選擇一個帶 options 的指令,Discord 會自動展開參數欄位:
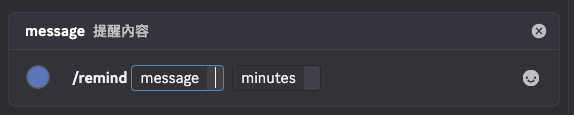
在 interactionCreate 裡用對應的 getter 取得使用者傳入的值:
if (commandName === "remind") {
  const message = interaction.options.getString("message");
  const minutes = interaction.options.getInteger("minutes");
  await interaction.reply(`✅ 會在 ${minutes} 分鐘後提醒你:${message}`);
}靜態指令 vs 動態指令
大多數指令的 options 是固定的,但有時候選項內容需要在啟動時從外部讀取。例如分類選項定義在試算表裡,資料會隨時更新。
作法是在 ready 事件裡先讀取資料,組好選項後再 push 進 COMMANDS 陣列,最後才呼叫 guild.commands.set():
async function prepareCommands() {
  // 從 Sheets 讀取分類選項
  const rows = await getCategoryOptions(); // 回傳 [["A 類"], ["B 類"], ...]

  const choices = rows
    .map((row) => row[0]?.trim())
    .filter(Boolean)
    .map((name) => ({ name, value: name }));

  COMMANDS.push({
    name: "search",
    description: "依分類搜尋",
    options: [
      {
        name: "category",
        type: 3,
        description: "選擇分類",
        required: true,
        choices, // 動態組合的 choices
      },
    ],
  });
}有 choices 的選項在 Discord 會呈現為下拉選單,使用者只能從預設選項中挑選:
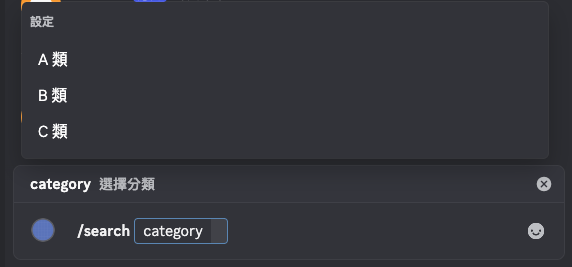
這個設計有一個限制:Discord 的 choices 最多 25 個。超過的話要改用 Autocomplete 模式(在使用者輸入時即時回傳候選選項,不受 25 個限制)。
權限控制:PermissionFlagsBits
有些指令只有特定人可以用。default_member_permissions 讓 Discord 在前端就攔截不符合條件的使用者,不符合權限的人根本看不到這個指令:
import { PermissionFlagsBits } from "discord.js";

COMMANDS.push({
  name: "announce",
  description: "發送公告(僅限管理者)",
  default_member_permissions: PermissionFlagsBits.Administrator.toString(),
  options: [
    {
      name: "message",
      type: 3,
      description: "公告內容",
      required: true,
    },
  ],
});另一種是在程式碼層做身份組檢查,用於不能用 Discord 權限系統表達的條件(例如「有某個特定身分組才能用」):
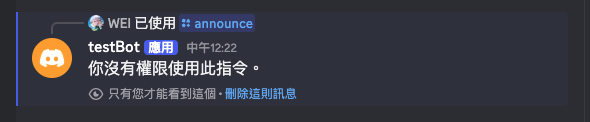
if (commandName === "announce") {
  const ALLOWED_ROLE_ID = "123456789012345678"; // 改成你的身分組 ID

  if (!interaction.member.roles.cache.has(ALLOWED_ROLE_ID)) {
    return interaction.reply({
      content: "你沒有權限使用此指令。",
      flags: 64, // ephemeral —— 只有本人看得到
    });
  }

  const message = interaction.options.getString("message");
  await interaction.reply(`📢 公告:${message}`);
}兩種方式可以混用:default_member_permissions 做第一層(前端)過濾,程式碼做第二層精細控制。
interactionCreate:三層分流
所有互動都透過同一個 interactionCreate 事件觸發,用類型判斷分流:
client.on("interactionCreate", async (interaction) => {

  // 第一層:按鈕互動
  if (interaction.isButton()) {
    if (interaction.customId === "confirm_action") {
      return handleConfirm(interaction);
    }
    if (interaction.customId === "cancel_action") {
      return handleCancel(interaction);
    }
    return;
  }

  // 第二層:下拉選單互動
  if (interaction.isStringSelectMenu()) {
    if (interaction.customId === "select_category") {
      return handleCategorySelect(interaction);
    }
    return;
  }

  // 第三層:Slash Command 互動
  if (!interaction.isChatInputCommand()) return;
  const { commandName } = interaction;

  if (commandName === "ping")     return handlePing(interaction);
  if (commandName === "info")     return handleInfo(interaction);
  if (commandName === "remind")   return handleRemind(interaction);
  if (commandName === "daily")    return handleDaily(interaction);
  if (commandName === "announce") return handleAnnounce(interaction);
});isButton() 和 isStringSelectMenu() 要放在前面,因為它們在 isChatInputCommand() 回傳 false 之前就需要被攔截處理。按鈕與選單的詳細設計會在後續篇章拆解。
ephemeral 回覆與 deferReply
flags: 64 讓回覆「只有本人看得到」,用於錯誤訊息、權限拒絕、操作確認等場景:
await interaction.reply({
  content: "你沒有權限使用此指令。",
  flags: 64,
});flags: 64 的回覆只有指令發送者看得到,訊息框右下角會有一個鎖頭圖示:
Discord Bot 有 3 秒的響應時限,如果處理邏輯超過 3 秒(例如要打 Sheets API),要先 deferReply 告訴 Discord「我還在處理」:
await interaction.deferReply({ flags: 64 }); // 可加 flags: 64 讓轉圈只有本人看到

// 執行耗時操作…
const data = await sheets.spreadsheets.values.get({ ... });

// 再用 editReply 回傳最終結果
await interaction.editReply(`處理完成:${data}`);deferReply 呼叫後,Discord 會先顯示一個轉圈的「思考中」狀態,等 editReply 回傳後才變成最終內容:

呼叫 deferReply 之後就不能再用 reply,必須改用 editReply。
完整骨架總結
把這篇所有概念組合在一起,index.js 的結構長這樣:
import { Client, GatewayIntentBits, PermissionFlagsBits } from "discord.js";
import "dotenv/config";
import { getLastCheckIn, setCheckIn } from "./googleSheets.js"; // 上一篇建立的函式

const client = new Client({
  intents: [GatewayIntentBits.Guilds, GatewayIntentBits.GuildMembers],
});

// ── 1. 靜態指令定義 ──────────────────────────────────────────
const COMMANDS = [
  { name: "ping", description: "測試 Bot 是否正常運作" },
  {
    name: "info",
    description: "查詢指定成員資訊",
    options: [{ name: "user", type: 6, description: "要查詢的成員", required: false }],
  },
  {
    name: "remind",
    description: "設定提醒",
    options: [
      { name: "message", type: 3, description: "提醒內容", required: true },
      { name: "minutes", type: 4, description: "幾分鐘後提醒", required: true, min_value: 1, max_value: 1440 },
    ],
  },
];

// ── 2. 動態指令(從外部來源讀取,在 ready 前 push 進去)────────
// 這裡先用 mock 資料示範概念;實際場景換成從 Google Sheets 或資料庫讀取
// 例如上一篇 googleSheets.js 的 getLastCheckIn 改寫成讀取選項欄位即可
async function getCategoryOptions() {
  // mock:回傳與 Sheets 相同格式 [["A 類"], ["B 類"], ["C 類"]]
  return [["A 類"], ["B 類"], ["C 類"]];
}

async function prepareCommands() {
  const rows = await getCategoryOptions();
  const choices = rows.map((r) => r[0]?.trim()).filter(Boolean).map((n) => ({ name: n, value: n }));
  COMMANDS.push({
    name: "search",
    description: "依分類搜尋",
    options: [{ name: "category", type: 3, description: "選擇分類", required: true, choices }],
  });
}

// ── 3. 需要權限的指令 ─────────────────────────────────────────
COMMANDS.push({
  name: "announce",
  description: "發送公告(僅限管理者)",
  default_member_permissions: PermissionFlagsBits.Administrator.toString(),
  options: [{ name: "message", type: 3, description: "公告內容", required: true }],
});

// ── 4. ready:組完所有指令後統一註冊 ─────────────────────────
client.once("ready", async () => {
  await prepareCommands();                              // 先組動態指令
  const guild = await client.guilds.fetch(process.env.GUILD_ID);
  await guild.commands.set(COMMANDS);                  // 再一次性送給 Discord
  console.log("✅ Bot 上線,指令已更新");
});

// ── 5. interactionCreate:三層分流 ───────────────────────────
client.on("interactionCreate", async (interaction) => {

  // 第一層:按鈕
  if (interaction.isButton()) {
    if (interaction.customId === "confirm_action") return handleConfirm(interaction);
    if (interaction.customId === "cancel_action")  return handleCancel(interaction);
    return;
  }

  // 第二層:下拉選單
  if (interaction.isStringSelectMenu()) {
    if (interaction.customId === "select_category") return handleCategorySelect(interaction);
    return;
  }

  // 第三層:Slash Command
  if (!interaction.isChatInputCommand()) return;
  const { commandName } = interaction;

  if (commandName === "ping")     return handlePing(interaction);
  if (commandName === "info")     return handleInfo(interaction);
  if (commandName === "remind")   return handleRemind(interaction);
  if (commandName === "announce") return handleAnnounce(interaction);
});

// ── 6. handler 範例:需要耗時操作時,先 deferReply ───────────
async function handleRemind(interaction) {
  const message = interaction.options.getString("message");
  const minutes = interaction.options.getInteger("minutes");

  // 快速回覆,不需要 deferReply
  await interaction.reply(`✅ 會在 ${minutes} 分鐘後提醒你:${message}`);
}

async function handleAnnounce(interaction) {
  // 權限檢查(程式碼層第二道防線)
  const ALLOWED_ROLE_ID = "123456789012345678";
  if (!interaction.member.roles.cache.has(ALLOWED_ROLE_ID)) {
    return interaction.reply({ content: "你沒有權限使用此指令。", flags: 64 });
  }

  // 耗時操作先 deferReply,之後改用 editReply
  await interaction.deferReply();
  const message = interaction.options.getString("message");
  // 耗時操作(例如呼叫 API、寫入 Sheets)
  // 此處可呼叫上一篇定義的 setCheckIn,或換成你自己的寫入邏輯
  const today = new Date().toISOString().slice(0, 10);
  await setCheckIn(interaction.user.id, today);
  await interaction.editReply(`📢 公告:${message}`);
}

client.login(process.env.BOT_TOKEN);一個完整的 Bot 就是這六個區塊:定義指令 → 動態組指令 → ready 時註冊 → interactionCreate 分流 → 各 handler 處理。
下一篇會拆解按鈕互動的完整流程:ActionRow、ButtonBuilder 的組合方式,以及 isButton() 事件怎麼路由到對應 handler。