上一篇的 Select Menu 讓使用者「選」,這篇要讓 Bot 回應得更漂亮—— Embed。
Embed 是 Discord 裡最常用的訊息格式。Bot 回傳的純文字很快就會淹沒在聊天紀錄裡,Embed 有左側顏色條、標題、多欄位可以整齊排列資訊,讀起來一目瞭然。查詢結果、公告、錯誤提示都很適合用它。
概念:Embed 的結構
一個 Embed 從上到下大概長這樣:
┌──────────────────────────────────────┐ │ [Author Icon] Author Name │◀ author │ │ │ Title (clickable URL) │◀ title / url │ Description │◀ description │ │ │ Field1 Field2 Field3 │◀ fields(inline) │ Field4 (full width) │◀ fields(非 inline) │ │ │ [Large Image] │◀ image │ │ │ [Footer Icon] Footer · Timestamp │◀ footer / timestamp └──────────────────────────────────────┘ ▲ 左側顏色條 = color
Thumbnail 是右上角的小縮圖,會和 Author / Title / Description 並排。
EmbedBuilder 基本用法
安裝這系列用的 discord.js v14 之後,直接從套件 import:
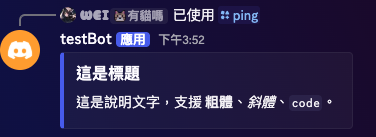
import { EmbedBuilder } from "discord.js";最陽春的 Embed,只有顏色 + 標題 + 說明:
const embed = new EmbedBuilder()
  .setColor("#5865F2")
  .setTitle("這是標題")
  .setDescription("這是說明文字,支援 **粗體**、*斜體*、`code`。");

await interaction.reply({ embeds: [embed] });reply 裡的 embeds 是陣列,一則訊息最多可以帶 10 個 Embed,不過實際上通常用一個就夠了。
所有欄位一覽
color — 左側顏色條
.setColor("#5865F2")          // hex 字串
.setColor(0x5865f2)           // 數字格式
.setColor("Blurple")          // Discord 內建顏色名稱
.setColor("Random") // 隨機顏色顏色條在視覺上很重要——成功用綠色、錯誤用紅色、提示用藍色,這樣的慣例讓使用者不用讀文字就能感知訊息的語氣。
author — 顯示在最頂端的一行
.setAuthor({
  name: "Discord Bot",
  iconURL: "https://example.com/avatar.png",   // 左側小圓圖(選填)
  url: "https://example.com",                  // 點擊名稱可跳轉(選填)
})通常放 Bot 名稱或觸發指令的使用者名稱。
title + url
.setTitle("查詢結果")
.setURL("https://example.com/result") // 讓標題變成超連結(選填)description
.setDescription("支援 Discord Markdown:\n**粗體** *斜體* ~~刪除線~~ `程式碼`\n[超連結](https://example.com)")字數上限 4096 字元,description 是 Embed 裡最能放長文的地方。
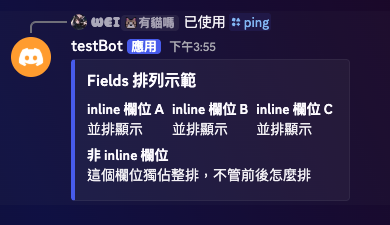
fields — 多欄位資訊
.addFields(
  { name: "欄位一", value: "內容", inline: true },
  { name: "欄位二", value: "內容", inline: true },
  { name: "欄位三", value: "內容", inline: true },
  { name: "換行欄位", value: "這個欄位獨佔一整排", inline: false },
)inline: true:同排並列,Discord 會自動換行(同排最多 3 個)inline: false(預設):獨佔一整排- 最多 25 個 fields
- name 上限 256 字元,value 上限 1024 字元
- name 和 value 都不能是空字串,可以用
"\u200b"(零寬空白)代替空值
thumbnail — 右上角小圖
.setThumbnail("https://example.com/thumb.png")image — 底部大圖
.setImage("https://example.com/banner.png")footer + timestamp
.setFooter({
  text: "資料來源:XXX",
  iconURL: "https://example.com/icon.png",   // 選填
})
.setTimestamp()            // 目前時間
.setTimestamp(new Date()) // 指定時間組合起來:查詢指令回傳 Embed
以一個 /user 指令為例,查詢使用者資料後回傳結構化訊息:
import { Client, GatewayIntentBits, EmbedBuilder } from "discord.js";
import "dotenv/config";

const client = new Client({
  intents: [GatewayIntentBits.Guilds, GatewayIntentBits.GuildMembers],
});

// ── 指令定義 ──────────────────────────────────────────────────────
const COMMANDS = [
  {
    name: "user",
    description: "查詢使用者資料",
    options: [
      {
        name: "target",
        type: 6,          // USER
        description: "要查詢的使用者",
        required: true,
      },
    ],
  },
];

// ── ready:連線後註冊指令 ─────────────────────────────────────────
client.once("ready", async () => {
  console.log(`Bot 已上線:${client.user.tag}`);
  const guild = client.guilds.cache.first();
  await guild.commands.set(COMMANDS);
});

// ── interactionCreate ────────────────────────────────────────────
client.on("interactionCreate", async (interaction) => {
  if (!interaction.isChatInputCommand()) return;

  if (interaction.commandName === "user") {
    await handleUser(interaction);
  }
});

// ── /user handler ────────────────────────────────────────────────
async function handleUser(interaction) {
  const target = interaction.options.getUser("target");
  const member = interaction.guild?.members.cache.get(target.id);

  const embed = new EmbedBuilder()
    .setColor("#5865F2")
    .setAuthor({
      name: target.username,
      iconURL: target.displayAvatarURL(),
    })
    .setTitle("使用者資料")
    .setThumbnail(target.displayAvatarURL({ size: 256 }))
    .addFields(
      { name: "ID",       value: target.id,  inline: true },
      {
        name: "帳號建立於",
        value: `<t:${Math.floor(target.createdTimestamp / 1000)}:D>`,
        inline: true,
      },
      {
        name: "加入伺服器",
        value: member
          ? `<t:${Math.floor(member.joinedTimestamp / 1000)}:D>`
          : "未知",
        inline: true,
      },
      {
        name: "身份組",
        value: member?.roles.cache.map((r) => r.toString()).join(" ") || "無",
        inline: false,
      }
    )
    .setFooter({ text: `由 ${interaction.user.username} 查詢` })
    .setTimestamp();

  await interaction.reply({ embeds: [embed] });
}

client.login(process.env.BOT_TOKEN);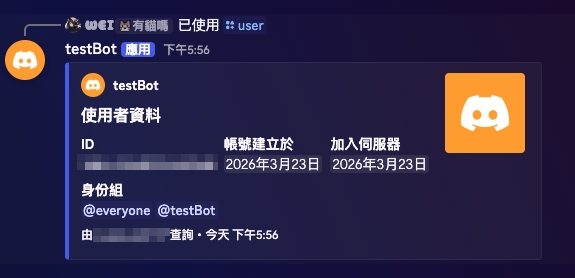
這裡用了 Discord 的 時間戳記語法 <t:Unix秒數:格式>——Discord 會根據每個用戶的時區自動顯示本地時間,不需要自己做時區轉換。
| 格式 | 範例輸出 |
|---|---|
<t:1234567890:D> | 2009 年 2 月 13 日 |
<t:1234567890:T> | 下午 11:31:30 |
<t:1234567890:R> | 16 年前 |
<t:1234567890:F> | 2009 年 2 月 13 日 下午 11:31:30 |
錯誤訊息用 Embed 更清楚
純文字的錯誤提示容易被忽略,Embed 版本更容易識別:
// 成功
const successEmbed = new EmbedBuilder()
  .setColor("#57F287")  // Discord 綠色
  .setTitle("✅ 操作成功")
  .setDescription(successMessage);

// 錯誤
const errorEmbed = new EmbedBuilder()
  .setColor("#ED4245")  // Discord 紅色
  .setTitle("❌ 發生錯誤")
  .setDescription(errorMessage)
  .setFooter({ text: "請稍後再試,或聯絡管理員" });

// 警告
const warnEmbed = new EmbedBuilder()
  .setColor("#FEE75C")  // Discord 黃色
  .setTitle("⚠️ 注意")
.setDescription(warnMessage);這三個可以包成工具函式,在整個 Bot 裡統一使用:
import { EmbedBuilder } from "discord.js";

export const successEmbed = (msg) =>
  new EmbedBuilder().setColor("#57F287").setTitle("✅ 操作成功").setDescription(msg);

export const errorEmbed = (msg) =>
  new EmbedBuilder().setColor("#ED4245").setTitle("❌ 發生錯誤").setDescription(msg);

export const warnEmbed = (msg) =>
new EmbedBuilder().setColor("#FEE75C").setTitle("⚠️ 注意").setDescription(msg);即時預覽工具
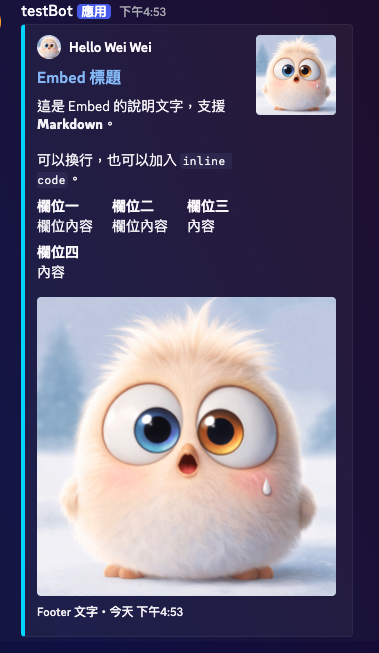
所有欄位填起來試試看,右側會即時渲染成 Discord 風格的 Embed,底部也會自動生成對應的程式碼:
這是 Embed 的說明文字,支援 Markdown。
可以換行,也可以加入 inline code。
欄位一
欄位內容
欄位二
欄位內容
import { EmbedBuilder } from "discord.js";

const embed = new EmbedBuilder()
  .setColor("#5865F2")
  .setAuthor({ name: "Discord Bot" })
  .setTitle("Embed 標題")
  .setDescription("這是 Embed 的說明文字,支援 **Markdown**。\n\n可以換行,也可以加入 `inline code`。")
  .setThumbnail("https://ray-blog-nine.vercel.app/images/discord-bot/discord-logo.png")
  .addFields(
    { name: "欄位一", value: "欄位內容", inline: true },
    { name: "欄位二", value: "欄位內容", inline: true }
  )
  .setFooter({ text: "Footer 文字" })
  .setTimestamp();
字數限制整理
Embed 有一個整體上限:所有文字加起來不能超過 6000 字元。個別欄位的上限:
| 欄位 | 上限 |
|---|---|
| title | 256 字元 |
| description | 4096 字元 |
| field.name | 256 字元 |
| field.value | 1024 字元 |
| footer.text | 2048 字元 |
| author.name | 256 字元 |
| fields 數量 | 最多 25 個 |
| 單則訊息 embeds | 最多 10 個 |
小結
Embed 本質上就是 EmbedBuilder 的鏈式呼叫,搞清楚每個欄位的位置之後,用起來非常順手。實際開發中最常用到的是:
- 查詢結果 — title + fields + thumbnail
- 公告通知 — color + title + description + image
- 操作回饋 — color(紅 / 綠)+ title + description
下一篇會帶入實際資料層的應用:用 Google Sheets 做後端,建立每日簽到系統——把前面學到的指令、按鈕與 Embed 整合到一個完整功能裡。